Widgets on slides
This was not supposed to be a separate category in this section, but for the sake of providing more diverse examples, we created it.
Here, I (@JerryI) would like to show a simple example of how to make a slide about how to make slides animate things in WLJS, as if it were part of a tutorial or lecture.
Code blocks
Since this is about programming, we need a "widget" for code and syntax highlighting. We directly borrow it from here.
.wlx

CodeBlock[str_String] := With[{Fe = EditorView[str]},
  <div class="text-left text-sm"><Fe/></div>
]
In my case, I needed a layout fix that forces text in the code block to be aligned to the left side.
.wlx
<style>
  .slide-frontend-object .cm-editor {
    text-align: left;
  }
</style>
Now, if anything on a slide is wrapped using this tag:
.slide

# Title

<CodeBlock>
(*SqB[*)Sqrt[-1](*]SqB*) + I
</CodeBlock>
It will be rendered as in a normal code editor.

Wrap your expressions using <Escape> tag to escape all XML-like symbols:
.slide

# Title

<CodeBlock><Escape>
(*SqB[*)Sqrt[-1](*]SqB*) + I
</Escape></CodeBlock>
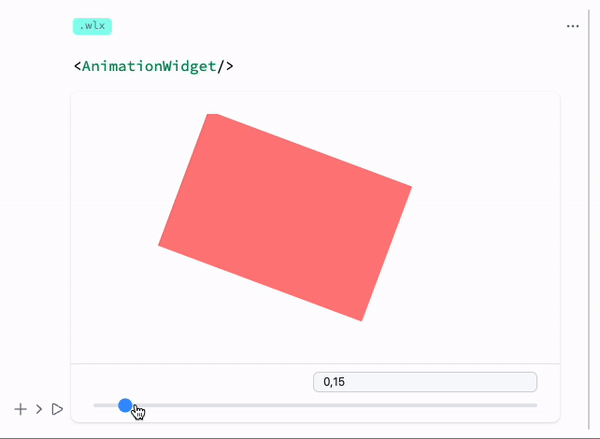
Animation widget
In my virtual lecture, there must be something I can do live and show to people. Let it be some simple animated graphics with sliders.
.wlx

AnimationWidget := LeakyModule[{
  SliderItem = InputRange[0.1, 1, 0.05, 0.1],
  symbol = 0.1
},

  EventHandler[SliderItem, Function[value, symbol = value]];

  With[{
    Widget = Graphics[{
      Green, Disk[{0,0}, symbol // Offload], Pink,
      Rotate[Rectangle[{-1,-1}, {1,1}], 3.14 symbol // Offload]
    }, Controls->False]
  },
  <div class="divide-y divide-gray-200 overflow-hidden rounded-lg bg-white shadow">
    <div class="px-2 py-3 sm:p-6">
      <Widget/>
    </div>
    <div class="px-2 py-2 sm:px-6">
      <SliderItem/>
    </div>
  </div>
  ]
]
Here, WLX is used only to have more control over the layout (adding shadows to elements, dividers, and so on). In principle, one could do almost the same using Row or TableForm. In general, HTML is much easier to use when it comes to design.
You can test it in a separate cell:
.wlx

<AnimationWidget/>
Layout of the presentation
I should probably make at least two slides—one for the title and the second one for my tricks.
.slide

# How to animate things in WLJS?

---

# Use Offload

<div class="columns-2">
  <div class="text-left mt-2">

Define your own values for a symbol and assign them to the graphics primitives you want.

<CodeBlock>
symbol = 0.1;
Graphics[{
      (*VB[*)(RGBColor[0, 1, 0])(*,*)(*"1:eJxTTMoPSmNkYGAoZgESHvk5KRCeGJAIcndyzs/JLwouTyxJzghJzS3ISSxJTWMGyXMgyRcxQAGU8cEeLgIAAP0TXQ=="*)(*]VB*), Disk[{0,0}, symbol // Offload], (*VB[*)(RGBColor[1, 0.5, 0.5])(*,*)(*"1:eJxTTMoPSmNkYGAoZgESHvk5KRCeGJAIcndyzs/JLwouTyxJzghJzS3ISSxJTWMGyXMgyRcxgMEHeyjjAYIBABm5FZs="*)(*]VB*),
      Rotate[Rectangle[{-1,-1}, {1,1}], 3.14 symbol // Offload]
}]
</CodeBlock>

Then create a slider and assign a handler to it:

<CodeBlock>
EventHandler[InputRange[0.1, 1, 0.05], (symbol = #)&]
</CodeBlock>

  </div>

  <AnimationWidget/>

</div>
Since I was too lazy to create my own classes, I relied on Tailwind's columns-2 to make it easier. In the end, we get the following: